How to Use a Metal Detector to Find Amazing Treasure

This is the moment you’ve been waiting for. After agonizing over which metal detector to buy, you finally have your unit in your hot little hand. You have your shovels and your scoops, your treasure pouch and your batteries. You are all set … except you aren’t quite sure what most of those buttons and dials on your machine mean.
Here’s a breakdown of some common technology and features offered on lower-end or mid-range detectors, which are the ones usually bought by beginners:
Ground balancing: Ground balancing is an important feature on detectors because it will cut down on false positive signals caused by mineralization of the soil in certain areas. That will stop you from digging a bunch of holes only to find nothing there at all –- that’s what another detectorist and I call “the worm that ate the dime” phenomenon.
You know your detector had a signal and when it’s gone, the only solution is that something moved that metal, right? The worm was our scapegoat in our early detecting days before we fully realized how much mineralization can mess with a detector.
Target identification: If your machine has a target identification mode, here’s what that means. When you’re running your unit and you hear a beep, look at your display screen. Numbers, or sometimes bars, will be shown. Those numbers or bars are telling you what kind of metal the target is likely made up of.
Different metals will have different ranges of numbers. When you are using a new detector, dig up all your first few targets to get an idea of the ranges associated with various metals on your machine.
Tone identification: Metal detectors generally have different tones for different metal. Metals such as iron usually elicit a low tone, while more valuable items, such as coins or silver generally have a higher pitch. I’ve often been fooled – especially in my early years of detecting – by mid-tones that were high enough to let me know they weren’t another nail. I’d cross my fingers and dig my target hoping to find a coin, only to find the medium-pitch tone led me to yet another bottle cap.
Even today, I still dig medium tones, and even low tones if they have a good enough signal. So while the higher tones are certainly more exciting, I’d rather dig every good signal than kick myself later for hearing someone dug up a great relic at a park I have hunted dozens of times.
Discrimination mode: You can adjust your discrimination mode when you want to weed out some of the signals that are likely trash or junk. Parks often have a lot of junk, as do beaches and old burn piles. Be warned though: You can miss out on some unusual finds if you up the discrimination mode too high. Also, some junk will fool the discrimination mode.
One of my favorite dig sites, a house built in the 1860s that sits on half of an acre, frequently has targets that trick my discrimination mode – square nails. I’d estimate at least half of my targets at this house are square nails. It drives me crazy every time I dig one up, but I’ve learned to accept it because I’ve found some amazing stuff there between my nail finds.
All-metal mode: As the name implies, when you use this mode, you don’t miss out on anything. You’ll get signals on every metal, including iron, tin, steel, aluminum and more. If you aren’t searching for anything in particular, like coins for instance, there’s no harm in using this mode.
It’s good for general all-purpose detecting and it will allow you to find deeper targets than you would by using the discrimination mode. But one drawback is that you’ll get signals for everything and there could be a lot of nails in your foreseeable future.

Below, please take a moment to view some of the metal detectors that we feel are the best available on today’s market:
| Photo | Model | Price | Features |
|---|---|---|---|
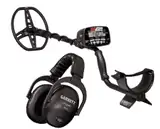 | Garrett AT Max | $$$ | Waterproof to 10 feet |
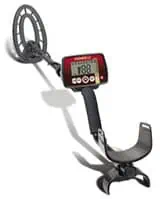 | Fisher F22 | $$ | 9″ Triangulated Concentric Coil |
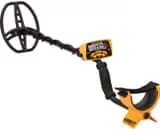 | Garrett Ace 400 | $$$ | 8.5 x 11" DD coil |
 | Minelab Vanquish 540 | $ | Search Modes: Coin, Relic, Jewelry, Custom, All Metal |
Now that you know the basic functions you’ll see on your machine, here’s a few other tips for metal detecting and choosing your hunt site before you go out for your first time.
All coils aren’t the same
Your search coil is a key component of your detector. Most detectors you purchase come with a mid-sized coil, usually in the range of 8 to 10 inches. This is a good, multi-purpose size for a coil. But coils come in a number of different sizes, and generally speaking, the bigger the coil, the more depth you’ll get when hunting. Plus, with larger coils, you cover more ground.
But larger coils aren’t always better. When you are digging an area that has a lot of trash, like a park or a former burn pile site, you might want to consider using a smaller coil, like a 4-inch or 5-inch coil if you have access to one. At junk sites, it’s common to have multiple targets within the same small area. So you might be passing by some great targets because they may be obscured by the multiple surrounding junk signals it’s trying to read.
It’s perfectly fine to only use the standard coil your detector came with. As long as you do your homework and find great locations to dig, you’ll find amazing stuff, even by only using a mid-sized coil.
The most important thing isn’t the size of the coil, but how you swing it.

Below, please take a moment to view some of the best-selling metal detectors currently available on Amazon:
| BEST SELLERS |
|---|
| 1) Garrett AT MAX |
| 2) Bounty Hunter TK4 Tracker IV |
| 3) Bounty Hunter Gold Digger |
Don’t swing your detector like a golf club
You don’t want to swing the detector like it is a scythe cutting wheat down in a field either. If you’re swinging your detector quickly and furiously from side to side, you’re not doing it right. For newbies, while swinging your detector you want to go slower and lower than you probably think you should.
Ideally you want your detector as close to the ground as possible.
Master the art of honing in on your target
When you swing your detector and hear a beep, you know the item’s general location. But you don’t want to dig multiple small holes or a giant crater to find your target. Believe me, in my early days, before I learned how to master my machine, I did both of these things.
I would dig my hole, confused when I couldn’t find anything. Then I would use my detector again, slower this time. I would hear another beep, which let me know there really was a target there somewhere and it wasn’t a false signal or my imagination.
Sometimes when I went slower with my detector, I could see I was off by several inches when trying to locate the metal in the first hole I dug.
Consider buying a pinpointer to speed up recovery times
As I spent more time detecting, I decided to lower my frustration level by buying a high-quality pinpointer. It took me about two years to make the purchase. My only regret is that I didn’t do it sooner. It cost a couple hundred dollars, but this has been the single best purchase I have made as a detectorist.

Pinpointers are amazing. Gone are the days where I dig a hole and sift through the dirt with my fingers, looking for small bits of metal. Gold and silver rings or coins are easy to spot because of the gleam and the size, but sometimes scrap metal or tiny pieces of metal will give you a solid signal, but you can’t find a thing in the hole you’ve dug.
That’s where pinpointers come in. You turn it on, stick it in the hole, move it around until you hear a signal. The closer you get to the target, the more frequently the pinpointer will beep. If you get to the point where your pinpointer is almost touching your target, you’ll hear a continuous beep.
Pinpoints have saved me so much time. Sometimes, I’ll get a beep indicating a shallow target in the zero to 2 inch range on my detector. I’ll move my pinpointer over the ground before I’ve even dug a hole and the pinpointer will go crazy. I’ll know right where the target is and I know I barely have to nudge my digging trowel into the ground and I’ll find my target.
Location, location, location
You are only going to find great treasure if someone has dropped something in the particular spot you are searching. Sometimes metal detecting is just dumb luck. You might happen to hunt in the same spot somebody buried a jar full of coins 100 years ago. They’ll be protected in the jar and you might be rich.
So while there is some luck involved, there’s a lot you can do to stack the odds in your favor. Visit your local library, do some online research, or talk to some senior citizens from the town you are hunting in. Ask them where old schools were located, or old city parks that fell out of use. Find out where people used to hang out.
When you find a good site, start looking. One thing I like to do is find some nearby big trees and start searching there first. Back in the day when the weather was sunny and hot, people sought shade from trees. I’ve found some great stuff by trees, including jewelry, coins, pocket knives and enough toy cars to make any 5-year-old boy jealous.
Hunt responsibly
Don’t let your excitement about the hunt turn you into the type of detectorist that other people love to hate. Make sure you follow basic rules about safety and show some consideration for people you will be sharing the land with.
Make sure you properly fill in your holes, bring some headphones so you aren’t strangled in the parking lot by an irate park patron who had his romantic picnic lunch interrupted by the constant chirping of your detector. If you dig up trash, make sure you throw it away – don’t just leave it there for someone to trip over.
Above all else, remember this: Some days you’ll find nothing but junk. But don’t give up. With a little persistence, you’ll find your first ring or coin and it could be more valuable than you ever dreamed.
- If you enjoyed reading this article, please “like” our brand new Facebook page!

